In 2026, supply chain disruptions, natural disasters, and rising food prices make bulk food storage reserve more important than ever. While short-term emergency kits get you through 72 hours, a proper home pantry can sustain your family for months or even years.
This complete guide shows beginners exactly how to build a long-term pantry on any budget. You'll get a proven step-by-step system, the best storage techniques, and top-rated products that actually keep food fresh for decades. Shop our complete Food & Nutrition category
Why Long-Term Food Storage Matters in 2026
• Food prices have risen over 25% in the last five years • Extreme weather events can empty store shelves within hours • A well-stocked pantry provides peace of mind and significant cost savings • Most families run out of food after just 3 to 7 days without power or deliveries
Building your own extended emergency food supply system is one of the smartest preparedness investments you can make. USDA Guidelines on Long-Term Food Storage

Step-by-Step: How to Build Your Long-Term Food Storage Pantry
Step 1 — Decide Your Storage Goals and Timeline
Start small with a 3-month supply and scale up toward 1 to 2 years of food as your budget allows. Calculate your household's daily caloric needs — FEMA recommends 2,000 calories per person per day as a baseline. Browse our Food & Nutrition category to get started
Step 2 — Choose the Right Foods for Long-Term Storage
Focus on calorie-dense, nutrient-rich staples with a 25-year or longer shelf life when properly stored. The core long-term storage foods are white rice, dried beans and legumes, wheat berries, rolled oats, pasta, sugar, salt, honey, and freeze-dried fruits and vegetables.

Shop Long-Term Food Storage Kit
Shop Emergency Freeze-Dried Food Kit
Step 3 — Pick the Best Storage Containers and Methods
Your food is only as good as your storage system. The four enemies of long-term food storage are moisture, oxygen, light, and pests. The right containers eliminate all four.
The gold standard system uses food-grade 5-gallon HDPE buckets with gamma seal lids, mylar bags inserted inside the buckets, and oxygen absorbers sealed inside the mylar bags before sealing.

Shop Food Storage Bags (50-Pack)
Shop Oxygen Absorbers (100-Pack)
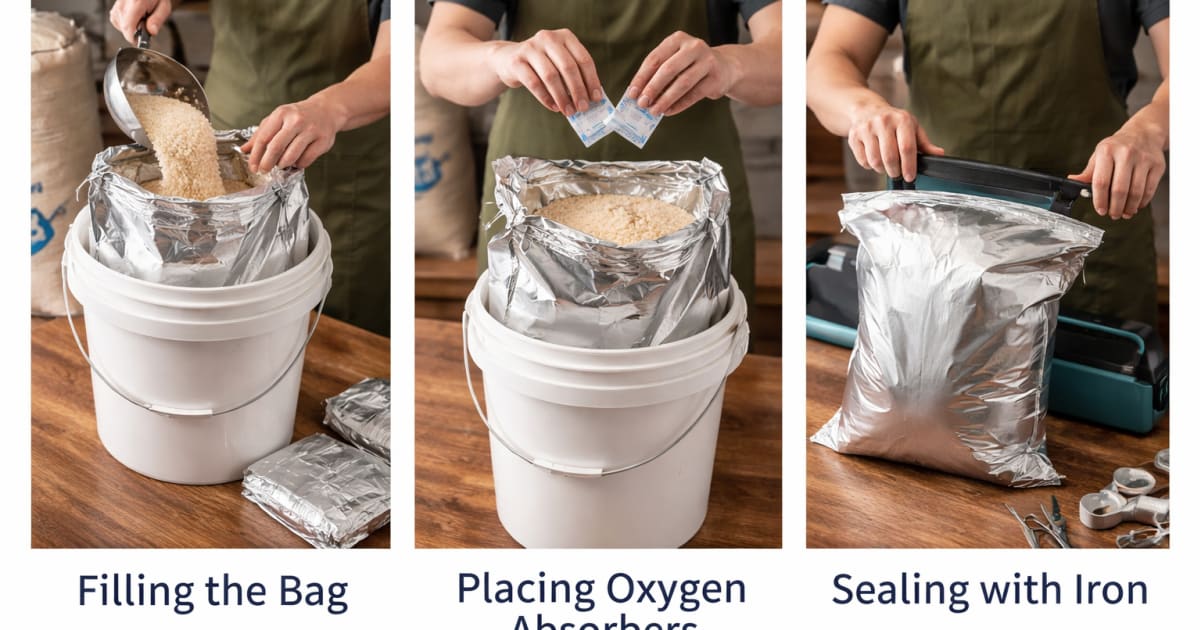
Step 4 — Master the Packing Process
The mylar bag and oxygen absorber method is the gold standard used by serious preppers and endorsed by the LDS Church — one of the most experienced long-term food reserve communities in the world.
The process:
- Place a mylar bag inside your food-grade bucket
- Fill the mylar bag with your dry food — rice, beans, oats, or other staples
- Drop the correct amount of oxygen absorbers on top of the food
- Seal the mylar bag with a flat iron or hair straightener pressed along the top edge
- Seal the bucket with a gamma lid
- Label with contents, quantity, and storage date
Use 300cc oxygen absorbers for half-gallon mylar bags and 2000cc oxygen absorbers for 5-gallon buckets.
Shop Bulk Rice & Grain Storage Supply
Step 5 — Store It Properly and Rotate Your Stock
The ideal storage environment is cool, dark, and dry — below 70 degrees Fahrenheit is the target. Every 10-degree increase in storage temperature cuts shelf life roughly in half.
Use the FIFO system — First In, First Out. New stock goes to the back, older stock comes from the front. Eat from your storage and replace what you use so nothing ever expires unused.

Step 6 — Track and Label Everything
Every container should be labeled with contents, quantity, pack date, and best-by date. Maintain a simple inventory spreadsheet — a paper notebook works perfectly — so you always know exactly what you have and what needs rotating.
Rite in the Rain Waterproof Notebook — perfect for your storage inventory
Browse Tools & Multi-Use for labeling and organization supplies
Long-Term Food Storage Checklist
Print this and check off each item as you build your pantry:
☐ 3 to 12 months of calories per person at 2,000+ calories per day
☐ Core staples: white rice, dried beans, oats, pasta, sugar, salt, honey
☐ Freeze-dried fruits and vegetables for nutrition and variety
☐ Mylar bags in multiple sizes (half-gallon and 1-gallon minimum)
☐ Oxygen absorbers — 300cc for small bags, 2000cc for 5-gallon buckets
☐ Food-grade 5-gallon HDPE buckets with gamma seal lids
☐ Flat iron or hair straightener for sealing mylar bags
☐ Permanent markers and label tape
☐ Inventory notebook or spreadsheet
☐ Rotation schedule — check stock every 6 months
☐ Manual can opener

Store-Bought Kits vs Building Your Own Pantry
The best approach is to start with a pre-packed kit for immediate baseline coverage and then build your bulk pantry alongside it.
Pre-Packed Kit: • Speed: Immediate — arrives ready • Cost: Higher per calorie • Customization: Limited • Best For: Beginners, time-limited buyers
Build Your Own: • Speed: Takes time to source and pack • Cost: Lower per calorie • Customization: Complete control • Best For: Budget-focused, experienced preppers
Shop 30-Day Emergency Food Supply
Shop Long-Term Food Storage Kit
Pro Tips for 2026 Long-Term Storage
• Store in a cool basement or interior closet — below 70 degrees Fahrenheit is ideal • Check all seals every 6 to 12 months and replace any compromised bags immediately • Add freeze-dried meals to your rotation for variety and morale during extended emergencies • Always include a manual can opener — electric openers are useless without power • Teach every adult family member where the storage is and how the rotation system works • Store water alongside your food — cooking rice and beans requires significant water
See our Best Emergency Food Kits for Survival 2026 guide
Conclusion
Building a long-term emergency food storage pantry in 2026 is easier and more affordable than most people think. Start with a few buckets of rice and beans, add oxygen absorbers and mylar bags, and you have the foundation of a food security system that can sustain your family through any scenario.