Most people assume help is always one phone call away.
During a major power outage, that assumption disappears fast.
Cell towers go down. Roads become impassable. Emergency services get overwhelmed with calls from every direction at once. Response times that average 8 minutes under normal conditions can stretch to several hours — or longer — when infrastructure fails across an entire region.
That gap between when an injury happens and when professional help arrives is where lives are won or lost.
This is not a guide about minor scrapes and headaches. This is a guide for the scenarios that actually happen during extended blackouts — the injuries that escalate quickly, the situations where doing nothing is not an option, and the steps that give someone a real chance of survival before a paramedic walks through the door.
If you haven't already tested your home's readiness, the Grid Down Simulator scores your household on water, food, power, shelter — and medical preparedness specifically. It only takes a few minutes and the results are sobering for most households.

Why Medical Emergencies Increase Dramatically During Power Outages
Most people don't connect power outages with medical emergencies. They should.
Every major blackout produces a predictable and consistent pattern of injuries and medical crises. The hazards multiply fast once electricity is gone — open flames replace electric lights, generators run in enclosed spaces, people attempt repairs in the dark, medications requiring refrigeration become ineffective, and physical and emotional stress push bodies toward cardiac events.
The injuries most likely to occur during prolonged blackouts follow a pattern:
Lacerations and deep cuts — broken glass from fallen items, improper tool use in poor lighting, candle accidents, and kitchen mishaps all increase dramatically during outages.
Burns — camp stoves, propane heaters, open candles, and boiling water on improvised cooking setups create burn risks that a prepared household rarely encounters under normal conditions.
Carbon monoxide poisoning — this is the leading cause of death during power outages in the United States. Generators, charcoal grills, and fuel-burning heaters produce lethal amounts of carbon monoxide when operated indoors or in partially enclosed spaces.
Falls and fractures — navigating dark hallways, stairs, and outdoor spaces without reliable lighting causes a significant spike in falls, particularly among older adults and children.
Cardiac events — the combination of physical exertion, stress, extreme temperatures, and disrupted medication schedules increases the risk of heart attack and stroke during extended outages.
Dehydration and heat stroke — during summer outages when temperatures inside homes can climb above 100°F, the elderly and very young are at serious risk within hours.
Each of these situations has a survivability window. Acting correctly inside that window — even without professional training — significantly changes the outcome.
For a full breakdown of how conditions deteriorate hour by hour, read: What Happens If the Power Grid Goes Down? A Step-by-Step Survival Timeline
The First Priority: Controlling Severe Bleeding
Uncontrolled hemorrhage is the leading cause of preventable death from traumatic injury. A severed artery can cause fatal blood loss in under three minutes. In a grid-down scenario where help is hours away, the ability to control severe bleeding is the single most important skill a household can develop.
Step 1 — Apply immediate direct pressure
Use the cleanest available material — sterile gauze is ideal, but a folded shirt or clean cloth works when nothing else is available. Press firmly and directly onto the wound without lifting. Maintain constant pressure for a full ten minutes. Most people apply pressure for thirty seconds, see blood soaking through, panic, and lift the material — which restarts the clotting process entirely. Keep pressure on. Do not lift. Do not check.
Step 2 — Pack deep or irregular wounds
Surface pressure alone is ineffective for deep puncture wounds, stab injuries, or wounds with jagged edges. These require wound packing — pushing gauze into the wound cavity and applying firm internal pressure from the inside out. Hemostatic gauze treated with QuikClot or Celox dramatically accelerates clotting and is standard in military and civilian trauma kits.
Step 3 — Apply a tourniquet when limb bleeding cannot be controlled
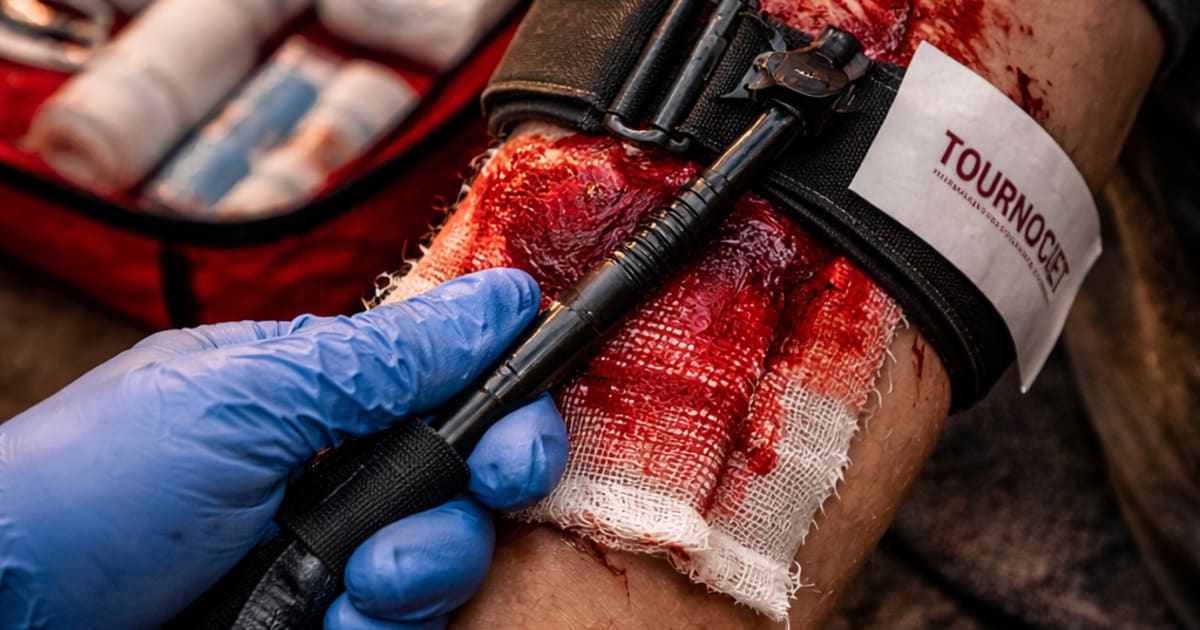
If severe bleeding from an arm or leg does not respond to two to three minutes of firm direct pressure, apply a tourniquet. Place it two to three inches above the wound — never directly on a joint. Tighten until bleeding stops completely, not just slows. Write the exact time of application on the tourniquet or the person's skin with a permanent marker.
The myth that tourniquets cause limb loss has been thoroughly disproven. Military data from over two decades of combat medicine shows that properly applied tourniquets are safe for hours. Hesitation and delay, not tourniquets, cause limb loss.
CAT Tourniquet (Combat Application Tourniquet)
For a full range of trauma supplies including pressure bandages, hemostatic gauze, and chest seals, visit the First Aid & Medical category.
Treating Burns When Medical Help Is Unavailable
Burns are among the most painful and frequently mismanaged injuries in non-clinical settings. Improper treatment — particularly the use of ice, butter, or toothpaste — worsens tissue damage and dramatically increases infection risk.
First-degree burns affect only the outermost skin layer, causing redness and pain without blistering. Cool the area with room-temperature running water for a full ten to twenty minutes. Cover loosely with a sterile non-adherent dressing. Over-the-counter pain relief is appropriate.
Second-degree burns penetrate into deeper skin layers and produce blistering, intense pain, and significant fluid loss from damaged tissue. Do not pop blisters — they protect the wound below. Cool with running water, then cover with a sterile non-stick dressing. Change dressings daily and monitor closely for redness spreading beyond the burn margin, increasing warmth, or purulent discharge — all signs of infection that require medical attention as soon as it becomes available.
Third-degree burns destroy all layers of skin and sometimes underlying tissue. These require professional medical treatment. Do not attempt to remove clothing adhered to the burn. Cover loosely with a clean dry material. Keep the person warm, still, and calm. Treat for shock — described in the next section — and arrange transport to a medical facility the moment it becomes possible.
Recognizing and Managing Shock
Shock is a life-threatening systemic response to inadequate blood flow reaching the body's vital organs. It can follow severe blood loss, major burns, severe allergic reactions, spinal injuries, or cardiac events — and it progresses rapidly without intervention.
What makes shock particularly dangerous in a non-clinical setting is that its early symptoms are easily dismissed or attributed to anxiety. By the time shock is obvious, it is advanced.
Early warning signs:
- Skin that is pale, cool, or clammy to the touch
- Pulse that is rapid but weak
- Breathing that is shallow and faster than normal
- Unusual restlessness, agitation, or confusion
- Complaints of intense thirst
- Nausea
Immediate response:
- Lay the person flat on their back
- Elevate their legs approximately twelve inches above heart level — unless a spinal injury or lower limb fracture is suspected
- Cover with blankets or an emergency mylar blanket to prevent heat loss — the body loses temperature rapidly in shock
- Do not give food or water
- Address the underlying cause — control bleeding, manage the burn, clear the airway
- Monitor breathing and pulse every five minutes and document changes
- Stay with the person continuously

Stabilizing Fractures and Sprains Without Medical Equipment
Falls in dark, unfamiliar environments are one of the most consistent injury patterns during the first hours of any extended power outage. Fractures, while rarely immediately life-threatening in isolation, become serious complications if the injured person cannot be moved safely, if circulation is compromised, or if an open fracture develops infection.
Recognizing a fracture:
- Visible deformity, angulation, or shortening of the limb
- Severe, localized pain that worsens sharply with any movement
- Rapid swelling and bruising at the injury site
- Complete inability to bear weight or use the affected limb
- In some cases, an audible crack or pop at the moment of injury
Stabilization steps:
- Immobilize the injury in the position found — do not attempt to straighten or realign
- Apply a splint that extends beyond the joints above and below the fracture — a SAM splint, rigid board, folded cardboard, or rolled magazine secured with bandaging all work
- Check circulation below the injury site by pressing on a fingernail or toenail and watching for color return, and by asking whether the person can feel sensation in the fingers or toes
- Elevate the limb if possible and apply a cloth-wrapped cold pack to reduce swelling
- For open fractures where bone is visible, cover with a sterile dressing — never push the bone back
SAM Splint Flexible Orthopedic Splint

Carbon Monoxide — Acting Fast on the Silent Threat
Carbon monoxide poisoning requires a different kind of response than traumatic injuries — because by the time symptoms are recognized, the person may already be severely affected.
The critical point: carbon monoxide has no smell, no color, and produces no immediate warning. A person can feel fine and then lose consciousness in minutes when concentrations are high.
Symptoms that develop progressively:
- Persistent headache that worsens over time — the most consistent early symptom
- Dizziness, lightheadedness, and difficulty concentrating
- Nausea with or without vomiting
- Shortness of breath during normal activity
- Confusion and impaired judgment
- Loss of consciousness in severe cases
Immediate response:
- Move the person immediately to fresh outdoor air — this is the most critical step
- Call emergency services if any form of communication is available
- Begin rescue breathing if the person is unconscious and not breathing normally
- Do not re-enter the building for any reason until it has been fully ventilated and professionally cleared
- Assume anyone else in the building may also be affected even if they appear normal
Never operate generators, grills, propane heaters, or any fuel-burning appliance indoors — including garages and partially enclosed spaces. Always maintain a working battery-powered carbon monoxide detector in your home as a non-negotiable baseline.
This hazard is addressed specifically in Day 3 of the How to Prepare Your Home for a Power Outage in 7 Days guide, which covers safe heating alternatives and ventilation strategies.
What Your Trauma Kit Needs to Actually Contain
A standard retail first aid kit purchased from a drugstore is designed for minor everyday injuries — small cuts, blisters, and headaches. It is not designed for the scenarios described in this guide.
A functional household trauma kit for grid-down preparedness should include every item on this list:
- CAT or SOFTT-W tourniquet — minimum two per kit
- Hemostatic gauze — QuikClot or Celox
- Israeli pressure bandage — emergency wound compression
- Vented chest seal — for penetrating chest wounds
- SAM splint — minimum two
- Medical shears and trauma scissors
- Sterile gloves — multiple pairs
- Emergency mylar blankets — minimum two
- Oral airway adjunct — sized for adults and children
- Wound closure strips — various widths
- Sterile burn dressing sheets
- Eye wash solution
- Permanent marker — for tourniquet time documentation
- Complete instructions for each item
Complete IFAK Individual First Aid Kit

Every person in the household old enough to assist should know exactly where this kit is stored. More importantly, they should know how to use the tourniquet and pressure bandage before an emergency occurs — not during one.
For a complete household preparedness checklist that includes medical supplies alongside water, food, and power, use the Emergency Preparedness Checklist.
Managing the Waiting Period After Stabilization
Once the immediate injury has been addressed and stabilized, the period of waiting for help begins. How that time is managed matters as much as the initial response.
Monitor the injured person's breathing, pulse, and skin color every five minutes and write down what you observe each time. Note any change — improvement or decline — and the time it occurred. This documentation becomes critical information for paramedics and emergency physicians when help eventually arrives.
Keep the person calm, warm, and as still as possible. Unnecessary movement can dislodge clots, worsen fractures, and accelerate shock. Speak clearly and reassuringly — stress and panic increase heart rate and blood pressure, which worsens bleeding and cardiac stress.
Do not offer food or water unless you are completely certain there is no internal injury and no surgical intervention will be required. Internal injuries are frequently not apparent from the outside. When in doubt, withhold.
If any form of communication is available — cell service, satellite messenger, or a neighbor with a working phone — call for help and stay on the line. If no communication is available, send a second able-bodied person to find help while you remain with the injured.
Having a tested communication plan before an emergency occurs removes confusion from an already chaotic situation. Read: Why Every Family Needs an Emergency Plan
The Most Important Step After Reading This Guide
Knowledge without practice creates false confidence.
Reading about tourniquet application is not the same as applying one under pressure with shaking hands while someone is bleeding in front of you. The gap between knowing and doing is closed only through hands-on repetition.
The Stop the Bleed program offers free and low-cost courses nationwide that teach the core bleeding control skills in under two hours. Wilderness First Aid certifications go further and cover the full range of scenarios described in this guide — including shock management, fracture stabilization, and environmental emergencies.
If you want to make sure your go-bag medical supplies match your home trauma kit, the Best Bug Out Bag Essentials Checklist breaks down exactly what should be in both.
Final Thoughts
Power outages expose the gap between how prepared people believe they are and how prepared they actually are.
For the vast majority of households, medical emergencies are the scenario they feel least ready to handle. The reality is that a focused investment in knowledge and the right supplies closes that gap faster than almost any other preparation you can make.
You do not need to be a paramedic. You need to know how to stop life-threatening bleeding, recognize when shock is setting in, stabilize an injury well enough to prevent it from worsening, and keep someone breathing and stable until professional help arrives.
That is a learnable, achievable skill set — and it starts with having the right supplies on hand before the next major outage hits.
Build your trauma kit today through the First Aid & Medical category and make sure every member of your household knows where it is and how to use what's inside it.
Stay ready, Essential Items Team